Saturday 23 April 2016

Chicken Drumsticks Masala


I have been wanting to try something with chicken drumsticks  since so long. Tried this easy recipe for a week day dinner. It turned out so good that it is going to be a  keeper. The freshly ground masala is so flavourful and you will feel the freshness in every bite of  chicken. The pictures I have taken dont do justice to how delicious this curry was. So try this and let me know how it turned out.

What you will need:

  • Chicken drumsticks- 1/2 kg
  • Onion- 3
  • Tomato- 2
  • Green chillies-1
  • Ginger garlic paste- 1 tbsp
  • Curry leaves- 1 sprig
  • Mustard seeds- 1 tsp
  • Oil- 2 tbsp

To roast and grind:

  • Coriander seeds- 2 tbsp
  • Cumin- 3/4 tbsp
  • Black Pepper- 1/2 tbsp
  • Red chillies- 4

How to:

1. Clean the chicken pieces well in running water and make one or two slits on it. Dry roast the items given until a nice aroma comes and grind it into a fine powder.


2. Heat oil in a kadai. Add mustard seeds. When it splutters, add onions, green chillies and curry leaves. Let it fry for two mins. Add ginger garlic paste. Let it fry till the raw smell leaves.


3. When the onions gets fried well, add tomatoes. Add turmeric powder and salt. Let it cook well till tomatoes turn  mushy.


4. When tomatoes turn mushy, add chicken pieces, mix well. Add freshly ground powder ,mix well and let it cook for 15 mins.


5. Add water till all the chicken pieces are fully immersed. Cover and cook in medium flame. When the curry reaches desired consistency and the chicken pieces are cooked well ,add coriander leaves, mix well and switch off. It will take atleast half an hour.


You can serve it along with rotis, rice or biriyani.


P.S:

  • You can try the same recipe  with normal chicken pieces too.
  • If you want to fasten the process, use a pressure cooker and pressure cook it after adding water till the chcken is cooked.
  • Try not to replace the freshly ground powder with ready made powders.


Tuesday 19 April 2016

Bitter Gourd and Potato Fry / Karela and Aloo Fry


Recently I got to taste Aloo- Karela sabji served as a part of Nort Indian thali at A2B. I liked the taste and this combination sounded new to me. So I thought I would try the same at home. 

Sometimes I try to recreate a recipe that I tasted at a friend's place or a restaurant. And then it turns to be tastier than the original version I attempted. This is one such recipe. When I started making it I dint know that it would turn out so yummy. Do try this irresistible veggie combo.


What you will need:

  • Bitter gourd- 2 medium sized
  • Potato- 1 medium sized
  • Onion- 2 medium sized
  • Green chilli- 2
  • Red chilli powder- 1.5 tsp
  • Amchur powder- 1 tsp
  • Coriander powder- 2 tsp
  • Turmeric powder- 1/2 tsp
  • Jaggery- size of half a lemon
  • Curry leaves- 2 sprigs
  • Mustard seeds- 1 tsp
  • Oil- 2 tbsp
  • Salt- as needed
  • Curd- 2tbsp

How To:

1. Slice the bitter gourd into thin slices. Add curd and 1/2 tsp of salt to it. Mix well. Set aside for 15 mins.


2. Peel the potato and slice it into thin pieces. Take water in a bowl and add potato to it. Slice the onions thinly.


3. Add 1 tbsp oil in a kadai. When it gets hot, add mustard seeds, When it splutters, add onions, green chillies and curry leaves.Let the onions brown a little bit.


4. When the onions get light brown in colour, squeeze the bittergourd from curd and add it to kadai. This is to remove the bitterness. Add potatoes. 


5. Add chilli, turmeric , amchur , coriander powder and salt. Mix well. Let it cook in low to medium flame. Add jaggery. Mix well and close with lid. Add the remaining oil little by little and stir in between. When the veggies are cooked well you can switch off.


Karela - aloo fry along with curd rice turned out to be a yummy meal. You can have it as a side along with sambar , rasam  or with rotis too.


P.S:


  • After adding the spice powders it will take atleast 20 mins to cook.
  • Using curd removes bitterness from bitter gourd to some extent. We also add jaggery. So there is no trace of bitterness in this recipe.
  • This recipe requires more oil. So feel free to add more oil when needed.


Tuesday 12 April 2016

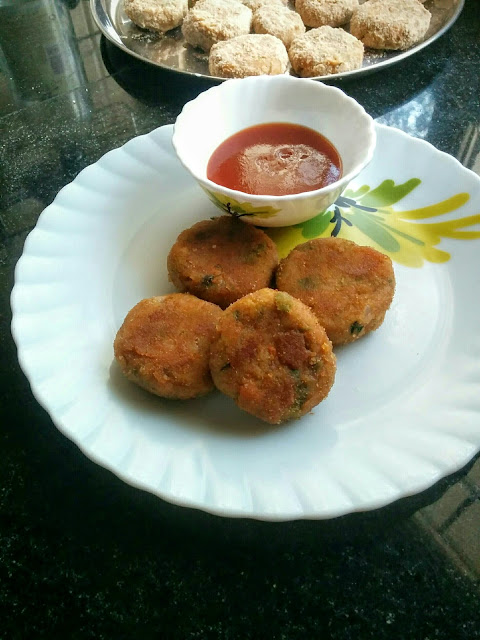
Veg Cutlet


This is one of my favourite snack recipes. I  tasted veg cutlets for the first time when I was in school. There were many snack items available in the canteen but I would always choose this. Even as a kid, I made up my mind to try this at home when I start cooking. And this was one of the few recipes that I tried during the initial days of cooking.

This is a great way to add more veggies to your diet. One comforting thing about this recipe is that they are pan fried. So, to me this is one of the few guilt- free snack recipes.


What you will need:

  • Potatoes-3
  • Carrot-2
  • Beans- 10
  • Green peas- 1/4 cup
  • Onion- 2
  • Ginger garlic paste- 1 tsp
  • Red chilli powder- 1.5 tsp
  • Garam masala powder- 1/2 tsp
  • Bread slices- 3
  • Bread crumbs- as needed
  • Salt- as needed
  • Oil
  • Maida- 3 tbsp
  • Water- 1/4 cup
  • Coriander leaves- 2 tbsp chopped
  • Lemon juice- 2 tsp

How to:

1.Wash the veggies. Peel and chop them. Add it to pressure cooker. Add water and pressure cook for 3 whistles. Once the steam releases, drain excess water.


2.Mash the veggies . Crumble the bread slices in mixie.


3.Heat oil in a kadai. Add finely chopped onion, let it fry for 2 mins. Add ginger garlic paste, let it fry for 3 mins. Add chilli powder and garam masla powder, let it fry for 2 mins.


4. Add mashed veggies, salt and crumbled bread. Mix well so that everything comes together. Add coriander leaves and lemon juice. Mix well and switch off.


5. Let the veggie mixture cool down. Pinch a small portion of the mixture and shape it in the form of a ball. Press it between your palms to form a patty.


6. Mix maida and water  in a plate to form a paste so that it coats the cutlet well. Take bread crums in a different plate. Dip the cutlets in maida mixture on both sides and then coat with bread crumbs on both sides.


7.Heat oil in pan. Place the cutlets. Fry them on both sides till they are  golden in colour. You can deep fry them if you are making in bulk.


You can serve them along with tomato ketchup or green chutney.


P.S:

  • You can add grated cauliflower, paneer or soya chunks to this recipe.
  • If you have to make in bulk you can proceed untill step 6 and refrigerate them  and just fry them next day.
  • Sauteing the mixture removes all the moisture so that the cutlets hold the shape well.
  • This recipe makes around 20 cutlets.